Groove Music saw the light of the day with the advent of Windows 10.
While Windows Media Player continues with its trademark role of the default music player for Windows, Groove Music serves as the default music player for Store apps. Groove supports managing playlists and a huge array of other tasks to make the whole process as possible for the convenience of the user. One of the more frequented problems in Groove is the spawning up of duplicate playlists. Even though there is no definite reason that can be termed as the main reason behind this issue, duplicate playlists are generally caused by organizing music files in a poor manner. This problem is the same in nature for duplicate music files, so today we set out in our quest to get rid of duplicate playlists in Groove Music.
Duplicate Playlists in Groove provide no benefit, rather they create unnecessary clutter. Clone Files Checker helps sort out all the mess with unmatched accuracy.
Cleanup Duplicate Groove Playlists, Download Clone Files Checker
CFC is a digitally protected software
Solutions
Solution 1: Place All the Playlists in The Root Folder
Groove is designed to by default, store its playlists in both the Music folder of the user account as well as the Music folder of the current user’s OneDrive account. Even though Windows itself employs a reasonably intelligent mechanism in place to prevent the duplication of data (provided the user is attempting to copy the move/ create the duplicates in the exact location as the original data), it’s very much possible for duplicate data to take roots very easily in subfolders. Since Groove detects its playlists from the subfolders of the locations we just mentioned, it sometimes also ends up showing duplicate playlists. In order to cleanup duplicate playlists, it is strongly suggested to move all the playlists from the subfolders to the root folder of both the locations under discussion.
- Click on View and then click the Navigation pane option. Now select Navigation pane to open up navigation panel on the left-hand side.
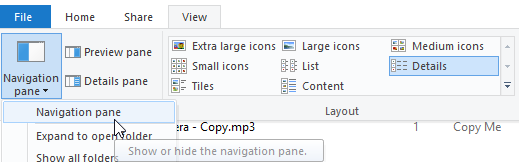
Opening up the Navigation pane - Click Music under This PC.

- Search for the following query string in the Search box which is located on the right hand side of the window. Here ext refers to the extension.
ext:zpl

- Copy all the playlists and move them to a location of your choice.

Copying the playlists to a location of your choice - If any duplicate content is detected, File Explorer will prompt if you want to overwrite them. Skim through each of them and select the appropriate course-of-action, choosing between overwriting/ skipping.
- Now simply delete all the playlists that were fetched as a result of the search query in step #3, and move all the remaining playlists from step # 5 to Music.
Solution 2: Use One Location to Store Playlists
One of the main reasons for the creation of duplicate playlists is using multiple locations to be detected in Groove, so to eliminate the duplicate problem it’s best to keep just a single location for storing playlists.
- Open Groove and then select Settings.

- Click on Choose where we look for music.

- Note down all the locations that are showing up in this window.

Note all the locations - Now copy all the playlists to either the Music folder in OneDrive or the Music Folder under the user folder on your computer.
- Now wait for a while until Groove updates itself and allows the changes to take effect.
Solution 3: Use PowerShell to Delete Duplicate Contents
PowerShell is an inbuilt framework for Microsoft operating systems, that helps in automating tasks within its perimeters. However, it’s a little tricky to get the heck of, and there is also the risk of data loss due to a wrong command being executed; hence it’s strongly suggested to proceed with caution.
- Search for PowerShell in the Start menu, right-click its icon and select Run as administrator.
- Paste the following script in it and press Enter to execute the command. Repeat this process for all the folders where Groove looks for music (step # 3 of the last solution). The Highlighted section is the full path of the folder.
Get-ChildItem “C:\Users\%userprofile%\OneDrive\Music” -Recurse -Include *.zpl | Get-FileHash | group -property hash | where { $_.count -gt 1 } | % { $_.group | select -skip 1 } | del