Nowadays the digital world is shifting towards the cloud where data can be accessed from anywhere in the world, as long as the person has the access to the world wide web. The rapid growth in the
technology paves the road to the cloud-centered world where the local hard drives will be the history. This article discusses how to rename files and sync them with some popular cloud platforms.
You can easily rename files by using Easy File Renamer. It is a completely safe software, and is bound to surprise you with the results. What’s super cool about it is that you can directly rename Google Drive data from this software by simply allowing it to access the data by signing into Google Drive through it. For OneDrive and Dropbox, at the moment you’ll have to download the data to your computer before EFR can do the trick for you.
Easy File Renamer follows Google Software Principles
Solutions
Initiate the Renaming Process
Since the article is more leaning toward bulk file renaming, a third party application such as Easy File Renamer is required in order to rename files. The advantage of this piece of software is, it can not only rename normal files, but also media files with a couple of clicks, without wanting to have any technology background.
- Go to the official website of Easy File Renamer.
- Download the setup file and install the software.
- Open the software from the start menu.
- Use the next phase to find out how to rename the files of each cloud drive.
How to Find the Default Local Path of Each Cloud Platform?
Usually every single cloud platform has its own local software which can be used to access to the files in it. The following instructions only demonstrate how to rename and sync files with popular cloud platforms, but if it’s a different platform than the ones mentioned below, you can still opt to follow the steps as the procedure is more or less the same in all the cloud storage platforms.
Google Drive
- Launch Easy File Renamer and click the Cloud Renamer tab.

Opting for cloud rename - Click Add Files | enter your Google credentials.
- Click Allow.

- Select as many files which you want to involve in the renaming operation and then click Add Folder.
- Once all the files have been loaded, click the Select Rule dropdown menu and select the renaming rule you desire.
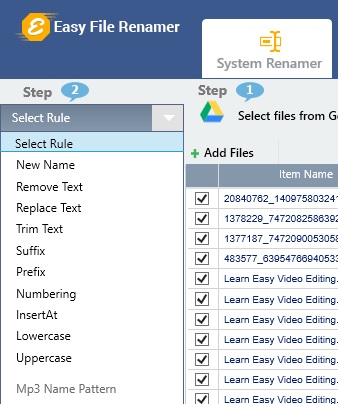
Selecting the desired renaming rule - Enter required info in the textbox (applicable in some cases) in the textbox(es) located right below the dropdown menu and then click Add Rule.
- The Item New Name column in the user interface will now be showing previews for the new names that will be applied once you give the go ahead.
- If all seems good, click Rename | Yes to launch the renaming operation.
Dropbox
- Click on the following URL to download Dropbox:
https://www.dropbox.com/downloading - Just visiting the URL is enough to download Dropbox as the download process is automated. However, if it doesn’t starts by itself, click on restart the download to initiate the download process manually.

- Once the downloaded is over, install it.
- Search in the start menu for Dropbox and click it.

Open Dropbox - Locate the Dropbox icon in the notification area on the Task Manager. Double click it to open its local folder where the local cache files are stored.
- Note down its path as it is useful for the next phase. (copy it from the address bar)
OneDrive
If you have Windows 10, then it’s not necessary to search it online to download as it’s already available in Windows 10.
- Click on the start button to open the start menu.
- In the start menu, find File Explorer and open it.
- On the left side of the File Explorer (previously known as Windows Explorer), locate OneDrive icon. Click to open it.
- Note down the path of the desired folder to rename OneDrive files.

How to Sync the Files with Cloud?
The sync process is fully automated. Do not quit the software before the syncing hasn’t been fully completed.
