MP3 files are the most favorite format for audio files throughout the world due to their portability, compatibility and the compactness they offer.
MP3 files consist of a string of data known as tag information which describes attributes of the music file. Quite often the MP3 file ends up either losing or corrupting it’s Album Art image while changing hands. This results in a blank display on the screen (in most media players) once the user plays a file in Windows 10. This article demonstrates a range of methods that guide the reader fix missing or corrupted Album Art data for MP3 files. These solutions are also helpful for the MP3 file which didn’t contain any Album Art to begin with.
Adding up Album Art to an MP3 file in Windows 10 isn’t much of a daunting task, as it might seem to some of our readers. All they need is to get their hands on Easy File Renamer, and the rest is as simple as they would ever want it to be. The results are exactly what’s everyone’s wish. They are highly accurate and are attained easily.
Fix Album Art for MP3 files in Windows 10
Easy File Renamer is digitally signed and a safe download
Solutions
Solution 1: Use the Classical Media Player
Windows Media Player has been associated with Windows for more than two decades as its default music and video player. Over the course of time, many new features were added to provide it an even more pivotal role in the must-have collection of a computer user. One of the more useful features offered by Windows Media Player is the ability to add Album Arts to any album without much ado. Just add up all the music files to the Media Player Library before carrying out the following procedure:
- Copy the image which you intend to use as Album Art.
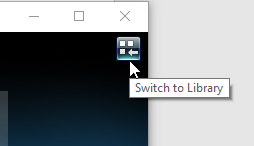
- Launch Windows Media Player and click on Switch to Library (only if it’s in the Now Playing mode).
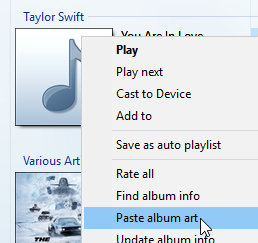
Selecting Switch to Library - Now paste the Album Art to the intended album. (Right-click on the album and click Paste album art).
Solution 2: Use Groove Music Player Native to Windows 10
Groove has been taken to be the designated successor to Windows Media Player in the near future. It comes as a native app in Windows 10 and uses the Windows Universal API. This means that it works across all the Windows platforms (mobile, notebook, desktop) seamlessly. Just like the Windows Media Player, it contains this handy feature which allows the user to change the Album Art with great ease.
- Launch Groove from the Start menu.
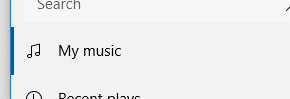
- Navigate to My music.
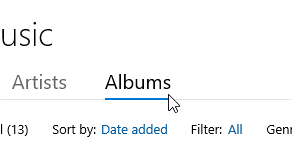
Opening up My music - Click the Albums tab.
- Now pick the desired album for which you want to change the Album Art.
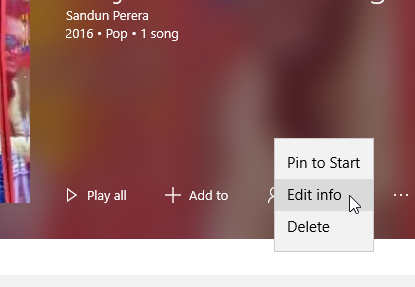
- Navigate to the three dotted button and click it. Now select Edit info from the menu that just opened.
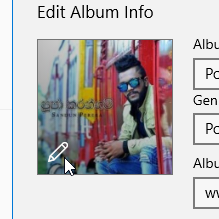
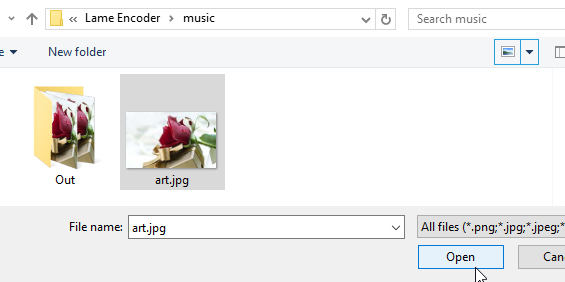
Selecting to Edit the info for the album - Click the current Album Art. Now simply select the desired image you wish to replace it with and finally click Open.
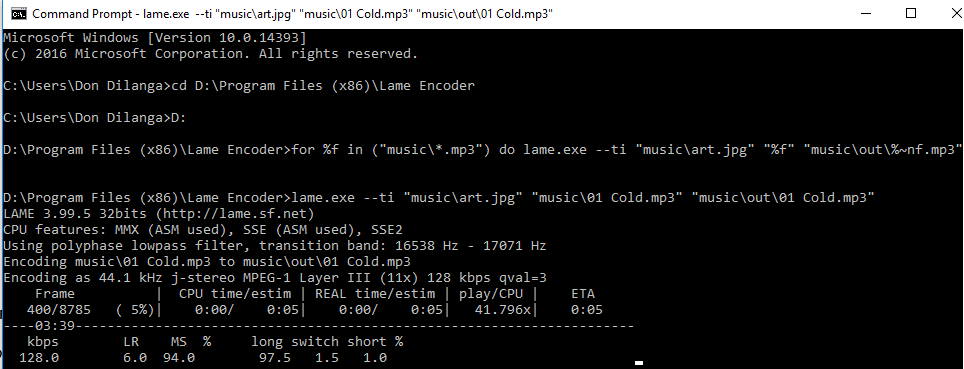
Solution 3: Use LAME with Command Prompt
LAME is an MP3 encoder which is actually the base software a vast majority of MP3 converters out there. Even though it is enriched with a tremendous amount of features, it has been designed to be used as a console application. This means that via Command Prompt any music file can be modified (including Album Art).
- Download the LAME executable file from the following website. It is guaranteed to work perfectly fine in high-performance mode on any Intel processor.
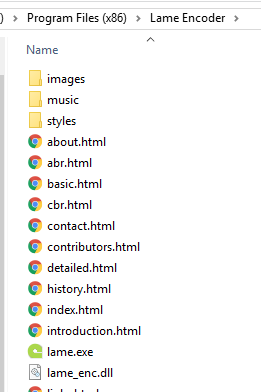
http://www.rarewares.org/mp3-lame-bundle.php - Move all music files to a specifically created folder named as music inside the LAME folder.
Moving up all the music data to the music folder - Now simply open Command Prompt, type out and execute the following command lines:
cd <folder where the lame encoder is extracted>
<drive letter:> (only if it’s in a different partition)
for %f in (“music\*.mp3”) do lame.exe –ti “music\art.jpg” “%f” “music\out\%~nf.mp3”
Solution 4: Using Easy File Renamer
Easy File Renamer is a sophisticated end user application designed to perform a wide variety of tasks related to file renaming. It makes excellent use of 10 intelligent rules to rename files in bulk quantities on the local computer. It also renames files in Google Drive, MP3 songs, renames and edits metadata for iTunes songs and edits tags for MP3 songs. It also provides the user with the option to move/ copy a whole bunch of files from one location to another location on the computer from a single centralized location. Staying true to the subject of this article, we will look at editing the Album Art for MP3 files.
- Download Easy File Renamer from the following website and then execute the setup to install it:
https://easyfilerenamer.com/ - Launch the software and click the Rename tab.

Selecting the Rename tag - Now click the MP3/ID3 Tags button.

- Click Mp3 Files and add those file(s) for which you wish to change the Album Art.

- Now click on Bulk Tag Editor.

Launching the Bulk tag Editor - Add the Album Art to the selected MP3 files and click Update.
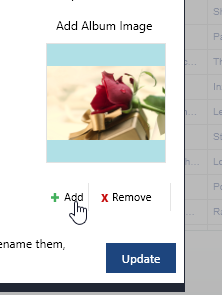
- Finally, click on Rename to finalize the process.

Finalizing the process